Stained Glass Cutting Tutorial
The thought of glass cutting makes lots of people very nervous but once you’ve got past your first attempt you’ll see that there’s nothing to worry about. It’s all about taking it slowly and practicing.
You don’t have to go quickly to cut glass, either. This video will show you just HOW slowly you can go when you hit a little snag in the glass:
Rescuing a score with confidence
The stained glass is cut to shape by using the pattern templates as a guide. The cutting is done in two stages:
- First you have to make a scoreline with the cutter – I use a Comfort Grip Supercutter (*paid link) – which starts a fracture.
- Then this fracture is deepened, which causes the glass to split. This is done by tapping, with pliers or by hand.
What You Need

Cutter and Cutting Oil
Dustpan and Brush
Your Pattern and Template Pieces
Sharpening Stone (*paid link) and safety goggles
Grinder (*paid link) (optional)
Running Pliers (*paid link) (optional)
Stained Glass Cutting
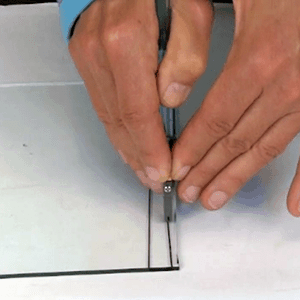
1. Making the scoreline
- Practice holding the cutting tool between your index and middle fingers, with your thumb at the back. If you don’t find this easy, try holding it like a pen or whatever feels comfortable. There is no ‘right’ and ‘wrong’ with this.
- To make a score, hold the cutter upright with the little screw in front of you and pull or push the steel wheel across the surface of the sheetglass. Don’t angle the glass cutter to the left or to the right as this will adversely affect the score.
- Listen for the sound. If you’re doing a straight cut with a ruler it will make a nice swishing sound. If you’re cutting a tricky shape you will go slower and the noise will be different. Getting used to this will take some practice.
- You have to go all the way from one side of the sheet to the other, you can’t stop half way. If you do this, the stained glass will break where you stopped making your scoreline.
- It’s important that you can see the cut line at all times so that you can follow it accurately. Pushing, rather than pulling the cutter means that you can see the pen line easily as you go.
How much pressure should you use?
- Get used to how much pressure you need by practicing on some cheap windowglass. It’s worth knowing that different types of artglass cuts and breaks differently.
- If you press too hard you’ll leave a white residue and the glass won’t break cleanly.
- If you don’t press hard enough the sheetglass won’t break.
- Cut on the smoothest side. Turn the template over if you want the texture on the front of your panel.
Try not to go over a cut a second time – it will damage your cutter. It’s best to start another scoreline.
2. Opening up the score line
 Now for the breaking. If it’s a straight line, place your thumbs parallel to the scoreline and apply pressure whilst twisting your wrists outwards. The sheet should split easily.
- If you are cutting thicker stained glass, you can use breaking pliers, a specialist tool for cutting, to apply even pressure to either side of the score line.
See the video below to see how these are used.
3. Cutting shallow curved shapes
If you want to cut a wavy line, then you have to open it up a bit more carefully. There’s different ways to do this. The diagram below is showing the tapping method.
Tapping with glass cutting tool
- If the stained glass doesn’t come apart, tap gently but firmly on the underside of the scoreline with the ball end of the cutter, to open up the score. You will get used to hearing the changing sound of the glass when it is ready to come apart.
- Once the score is open, and the tapping sound is lower, gently prise the glass apart with both hands.
4. Cutting deep curves
These are some of the hardest cuts to make, so be patient. The deeper the curve, the harder it will be to cut. You could practice on cheap sheetglass and see how deep a cut you can make. Any shapes that are nearly right angles will make your panel weaker.
Small steps towards deep cut

- Do the most difficult cut first, leaving the biggest possible amount of glass around it. This will help it not to break.
- To cut deep curves, first make a confident scoreline along your cut line (shown by the curved dotted line). This stops the glass breaking beyond this line.
- Then make a few more scorelines inside the curve
These inside curves are the most difficult shapes to cut, and need a bit more explanation than I’ve got space for here.
So I’ve written ‘Cutting Perfect Curves‘ just for you. It’s a free e-book that shows you how to avoid cutting mistakes by learning from all the costly ones I’ve made over the years!
To receive it, sign up for the Everything Stained Glass newsletter in the form at the bottom of this page. Thanks!
Nibbling with grozing pliers

- If you’re right-handed, hold the piece firmly with your left hand.
- Use the grozing pliers to nibble away at the scorelines, moving bit by bit towards your original line.
- Safety glasses are a must for all stages of cutting glass. When using grozing pliers shards can fly off, so take special care doing this.
Glass Cutting From Templates
Now you’ve practiced with the tools and tried the techniques shown above, you’re ready to start cutting from your pattern templates.
1. Laying out the pattern
- Lay the pattern pieces on your stained glass so that you can cut easily from one edge to the other. You can save glass if you think about this carefully.
- Go round the templates with a fine pen and number them.

2. Where shall I cut first?
- Make the longest cuts first. In this case, cuts 1 and 2 go from the top to the bottom of the sheet.
- If you can, use part of the shape to cut across the sheet for the next cuts – see cuts 3 and 4 below. This saves you glass and time.

3. Which cutting tools and techniques should I use?
- Use the grozing pliers for skinny bits of glass. Line the end of the jaws along the scoreline and either ease or snap the strip off.
- The ball end of you cutter is better for larger pieces, but be careful not to tap too hard where there is a point. Snap the stained glass off either with your thumbs, or use the grozing pliers to ease it off after tapping.
- Finally, use the rough bit inside the jaw of the grozing pliers to file off the rough edges.
- Make them safe by smoothing the edges with the carborundum stone. Don’t try and grind edges with this, it will take forever. If you find that you consistently need to grind to get the shapes to fit then you will need to buy a grinder (*paid link).

Not having a grinder is ok for making leaded panels, as the lead came hides a bit of roughness. It will make your life much, much easier though, so I would recommend one.
A grinder is essential if you are using copper foil, as the edges need to be really neat.
It’s worth spending some time at the glass cutting stage. If you move on to the next step (leading or copper foiling) before you’ve learnt how to cut accurately, each step will get more and more difficult for you.

Helpful Resources
- If you want some advice on which cutter to buy there’s a page here that explains the different types, and which one is best for you.
- This helpful short video shows how to use the various tools and the different cutting techniques:
Video of stained glass cutting tools and techniques
Once you’ve cut all your pieces and made sure that they fit the pattern accurately, you’re ready for the next step:
Using copper foil? Then there’s a nice relaxing step for you – wrapping your glass pieces in foil
Using lead came? Your next step is to lead your panel
Hi Milly,
I enjoy reading your newsletters and discovered something you or maybe some of your readers might find helpful. In the past I’ve used heavy card stock type paper for the pattern pieces and a glue stick or adhesive spray to affix them to the glass. I always had trouble with the water from the grinder dissolving the glue and/or the paper disintegrating before I was finished grinding.
Recently, I found that I was out of the thick paper and so I printed the pattern on glossy photo paper. After cutting out the pattern pieces I used rubber cement to attach pieces to the glass. I let the pieces dry overnight. I found the pattern pieces didn’t disintegrate and stayed in place until I finished grinding. The photo paper costs a bit more, but I found it to be worth it.
A simple soaking in water soapy water frees the pattern from the glass.
Thought this might be helpful.
Thanks again for the informative articles,
Dennis
This is a very good idea, top tip! Thanks so much for taking the time to add this Dennis.
Hello and happy 2021! Patterns and cutting are where I struggle mightily. I have tried the tracing with a light pad under, using card stock as well as using vinyl labels for my pattern pieces. I think my issue is with my arthritis and not being stable with my cutter. Was thinking of a Beetle Bits small system to help with that. I have 4 different cutters and none help my accuracy going from pattern to cutting.
Any suggestions that anyone can give would be much appreciated.
Arthritis is such a nuisance Jen – lots of my readers complain of painful hands.
Have you tried a Toyo Custom Grip Supercutter? It’s one I started using fairly recently and loved.
I recommended it to another follower with arthritic hands and she wrote back saying how much it helped. It’s on this page: https://everythingstainedglass.com/recommended-tools
I hope it helps you if you try it.
I’ve enjoyed all your videos and I’ve been practicing on glass from some scraps I got from a shop the clear glass Cuts perfectly but when I went to cut my shapes out from my template the glass stained glass shattered in different ways I didn’t expect I’m really not sure what I’m doing wrong
That sounds a bit disheartening Peggy. Don’t give up, it’s most likely a pressure issue, with you pressing too hard. There’s lots of cutting glass trouble-shooting on this page – scroll past the video and read the check points below. Keep going, it does take practise.
Thank you so much for taking the time to send this to your followers. I am very new to the hobby so don’t have many tips to share but good lighting from different angles helps me avoids shadows from my hands when cutting because you don’t want to lift and adjust your piece half way through a cut. I have a couple of clamp on adjusting desk lamps with bright lights shining from two angles onto my surface.
You’re right Mike, good lighting is crucial to making better stained glass. Everything just gets more accurate when you can see 🙂 Thanks for your suggestions.
Thank you so much. Everything was easy to understand and left me eager to get started. Thank you again
That’s great to know Pamela. Thanks for taking the time to comment.