
How To Etch Glass With Stencils
There’s hundreds of glass etching stencils to choose from, so how do you know which ones are best for you? Read on to:
- Find out how to etch glass quickly and safely with etching stencils
- Learn about the best type of etching stencils available for personalising your glassware
- Discover which items you need for a complete glass etching kit and where best to buy one
Click here to see the range of easy to use Rub n Etch Stencils on Amazon (*paid link)
Which Etching Stencils?

- There are three main things to think about:
- Are the stencils re-usable?
- Are the stencils suitable for the etch method you’re using?
- Do you want to design your own custom glass stencils or buy pre-designed ones?
Single Use
One-off disposable stencils are the best for beginners, as they are easy to use and are the cheapest and give you the chance to see if you like the effects. They’re suitable for use with glass etching paste, but not strong enough to withstand sandblasting.
Rub n Etch stencils are a typical example of this type of stencil.
Click here to see some lovely Rub n Etch flower stencils available at Amazon (*paid link)
Much stronger but not re-usable are the pre-cut adhesive-backed vinyl stencils like Peel n Etch. These are primarily for chemical etching and sandblasting, but are absolutely fine for use with etching cream and good for mirror etching too.
Reusable
Reusable etching stencils – for example Over n Over – are a tiny bit more expensive to buy, but work out cheaper in the long run. But only if you want repeats!
Click here to see alphabets, sparkling borders and other reusable stencils on Amazon (*paid link)
Some manufacturers claim that you can reuse their stencils up to 100 times but I think 20 uses is probably more realistic. These stencils are suitable for both glass etching paste and sand etch.
Design choices

All of the above types of glass etching stencils come in a wonderful variety of pre-designed patterns. These include wedding and Christmas themes, alphabets for personal messages, butterflies and flowers. You name it, I bet you can find a stencil of it.
So what if you want to make your own? You can either use Over n Over stencil material or Grafix Stencil Film (available here at Amazon – paid link) to draw and cut your own design out with a hobby knife.
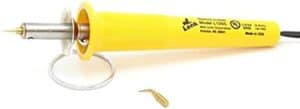
Better still, you can use a stencil cutting tool which is far easier than knife (see below). They’re like really small soldering irons and you hold them like a pen so you can ‘draw’ your designs rather than cut them on the vinyl. At around 20 bucks, I think that’s a bargain and would definitely recommend one.
The Wall Lenk L12SCK Cutlass Stencil Cutting Kit (*paid link) (see image below). Don’t be put off by the ridiculous name! It’s a tool for cutting out stencils and is absolutely brilliant. Hope that helps get you started.
If you prefer to design on your computer, you can send a digital file to companies who will make them into stencils for you.
Simple 4-Step How to Etch Tutorial
Etching isn’t difficult, but you do need to be fairly precise, careful and patient. Don’t forget that you can etch on both sides of the glass to give you an interesting layered effect.
I’ve used Rub n Etch etching stencils here, which you can buy from Delphi Glass. They’re very helpful, know everything about glass AND sell stencils and Armour glass etching paste too.
What You Need
Etching stencils and cream, brush, glass, wooden stick for burnishing, scissors, masking tape, ruler, hobby knife, paper towels, running water, protective gloves and goggles.
1. Applying Your Stencils
Clean your glass thoroughly. Soap and water are fine, but not the products that resist fingerprints – they leave a film on the glass, which prevents the paste working.
Cut around the stencil/s that you want to use, along with the frosted backing. Measure carefully and place on the glass, blue down, shiny up.

Stick the edges with masking tape, making sure that you don’t cover any of the pattern. Try not to stick masking tape too close to the stencil either, as it makes burnishing it on easier if there’s a bit of space around the edge.
Using a wooden stick with rounded edges (exactly like a lollypop stick) and a fair bit of pressure, go over the glass etching stencils carefully, sticking them onto the glass. You can see in the photo that the blue changes colour when stuck.

This next bit is tricky. Peel back a bit of the masking tape and carefully use a craft knife to separate the clear top sheet from the blue stencil. If you can remove the top sheet and keep the masking tape in place, it’s much easier, as you only have to re-stick the edges.
If you have to take the masking tape off to remove the top sheet, you’ll have to re-do the masking tape. Cover any glass you might accidently get glass etching cream on with masking tape, along with any little holes in the blue surround, otherwise it will etch where you don’t want it to.
2. Applying The Etching Paste

Safety first. Put gloves and goggles on, and make sure you’re in a well-ventilated place with running water. Shake the Amour Etch cream and put a very thick layer over the stencil. Don’t skimp on this otherwise you will have a patchy etch. The Amour Etch instructions say leave for a minute, but I tried that and it didn’t work very well. I left mine for 10 minutes, and it was fine. It varies a little depending on the temperature, but do remember that if you leave it longer the fumes become stronger, so ventilation is crucial.
3. Removing Etching Cream and Stencil
With your gloves on, run the glass under slowly running luke warm water. Once all the glass etching paste has gone, you can remove the masking tape and the stencil.
4. Cleaning Your Glass

Clean your glass with a glass cleaner or soap and water.
Don’t be alarmed if there’s nothing there to start with – it needs to dry out completely before you can admire your handiwork.
Helpful Resources
I’ve also found a video showing you how to etch glass using Etch n Rub stencils and Armour Etch cream. They’re not wearing gloves though – not a good idea. It may start you off on a creative journey of your own:
If you’d like to know more about different etching pastes, there’s more detail on my Glass Etching Cream page.
HI Milly, Do you know if its possible to use stencils I have created with the Cricut cutter? I guess I can try…but I am wondering if anyone has tried the cricut cutter for stencils.
Thank you.
Edie, good question. It depends what material you cut the stencils with. The regular sticky backed plastic (we call it Fablon, I think it’s referred to as contact paper in the US?) will work if you can use that.
I hope that helps.
Hi Millie: Can the etching be done on coloured glass or is it only for clear glass? I love your tutorials and emails. I’ve learned a lot from you.
You can etch on any glass but it shows up best on clear or very lightly coloured glass. (I’m talking etching cream rather than acid-etching, which is a different kettle of fish and is best used on handmade flashed glass.)
Actually, I find that glass etching of this type shows up best with black opaque glass.
This works very well too, thanks for your suggestion Mr Roboto.