Blending Paint Tutorial
Any guide to glass painting techniques has to include matting, or shading.
It’s the exciting process that will make your work look 3-D, like the drapery in church windows.
Matting requires a very different approach than other stained glass painting techniques. Instead of putting paint on, you’re taking it off with various different brushes called ‘scrubs’.
Once you’ve made your line work painting permanent by firing it, you’re ready to paint over it with a wash, or matt, which you then proceed to work into gradually to reveal the colour underneath.
Think of a steamed up window that you draw into to reveal the world beyond, and you’re on the right track.
Stained Glass Painting Techniques
What you need

- Palette for mixing.
- Palette knife.
- Water.
- Paint.
- Gum Arabic.
- Pipette.
- Stained glass painting brushes – a badger brush (left in photo), arious ‘scrubs’ and a 1.5inch ox hair ‘mop’ (next to badger brush in photo).
- A light box.
1 Clean your glass
The paint will separate out and be hard to apply evenly if the glass is dirty or greasy.
You can clean it with alcohol.
– Isopropyl is expensive but fantastic.
– If you can’t get hold of it, simply smear a bit of your mixed paint and rub it over and then off your glass.
2 Charge your painting brush
As usual with any stained glass painting techniques, getting the consistency of the glass paint is crucial.
– It needs to be runnier than the paint used for your line work, as you’re creating a delicate wash rather than a solid one, so go for evaporated milk as a guide.
– Use water on your mop to dilute part of your mixed paint.
– Test the paint on your light box for depth of colour beforehand.
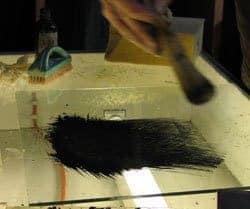
3 Applying the paint
You’re aiming to cover the surface of your glass with thick lines of diluted paint.
– Use the mop at a 45degree angle to stroke the paint in continuous lines from one edge of the glass to another.
– You can’t hang around here, as the paint will start to dry and you need to blend it before it does so.
– The good thing about this particular painting technique, is that if you make a mistake, you can go over it again with the mop and have another go.
4 Blending the stained glass paint

This is where the unique qualities of the badger brush come into play.
Nothing else will do this job, they’re an expensive but essential part of your stained glass painting equipment.
– You need to hold the badger at right angles to the glass and very lightly, barely touching the paint, make repeated figures of eight over the whole of the painted area.
You’re aiming for an even coverage that is blended seamlessly. It’s not easy.
I’d recommend lots of practice, with different consistencies of paint and darkness, until you start to feel confident with these stained glass painting techniques.
5 Stippling the matt (optional)

Once you’re happy with the matt, and before it’s dried, you can create a stippled effect by repeatedly tapping into the surface of the paint with the tip of the badger brush.
This breaks up the paint and allows pinpricks of light to penetrate the matt.
You can see from the photos how different an effect this produces.
Once you’re happy with your wash, wait for it to dry to a dull grey.
If you’re impatient use a hairdryer.
6 Breaking into the surface of the matt
What with, you may ask? With absolutely anything that makes the kind of marks that you need for your particular project.
This photo shows how you can use a crumpled up paper tissue to create a texture, or flick a drop or two of water on to create a halo effect.

This is when the scrubs – cheap brushes modified by cutting – are used.
If you want something subtler, you can stroke and dab away parts of your matting gently with softer brushes, to create a rounded, gentle effect.
The sleeping squirrel (below) was formed in this way by one of my students.
The joy of these stained glass painting techniques is the freedom it allows you to experiment and explore.
I’ve used bubble wrap, needles, sticks, cotton wool, netting, combs and sponges for texture, literally anything that gives me the marks I’m looking for.

7 Firing the stained glass
The matt will fire about 25% lighter in the kiln, but you can always do another layer – or more – if it needs more depth and form.
Assuming it’s simple paint mixed with water, I’d recommend the following kiln firing schedule:
Segment 1. 570F/300C per hour to 1220F/660C (matt finish)-1250F/675C (shiny finish). Soak 5 mins.
Segment 2. Full to 1040F/560C. Soak 5 mins.
Segment 3. 10/50 degrees per hour to 986F/530C. No soak. Off.
Helpful Resouces
This is a fun, 2 minute video showing the traditional stained glass painting techniques of matting and scrafitto. This is the term for picking the paint off.
The video shows how the dark painting really brings out the colour of the artglass, and how easy it is to add fantastic texture and patterns to your glasswork.
Video showing stained glass painting techniques
There’s another longer (5 minute) video covering both the line work and matting techniques at the bottom of this page here.
If you are just getting started there is this Peter Mcgrain Deluxe Paint Starter Kit (paid link)on Amazon

Hi, on the firing side of things, what do you mean by segment 1, 2 and 3? Is this just three methods of firing? And if so then which do you find best?
Thank you
Cathy
The segments are the stages of one firing. For example you might go slowly at the start in Segment 1 (when the glass is cold and vulnerable), speed up rapidly in Segment 2 (when the glass is past danger point) and Segment 3 cool down slowly in Segment 3 (giving glass time to anneal slowly when it’s vulnerable to cracking)
I hope that helps.
Hi I’m new to the painting of glass with enamel and trying to learn the traditional method. I ordered a kit to start and am looking on advice for a kiln to buy that is best for firing the painted glass. I’m not looking to use the kiln for fusing or anything else just to fire it to make the paint set. Would love to hear your recommendations. Thanks
Laura
Hello Laura, you can fire paint in any kiln. I started off with a small second hand circular one that had been used for pottery. Just make sure there’s no clay on the shelves – either use fibre paper to protect or get new shelves. A small fusing kiln is also a good start if you’re going new – they’re shallow and you won’t need depth for painting. My large one was a fuser from Kilncare in the UK – don’t know where you are so can’t recommend specifics. Have fun.
Hi Milly, Ive just bought a kiln, oh joy, but am puzzled by the schedules! In the instruction book thy are labelleld low stain and high stain. Ive rung Kilncare who were pretty hopeless, and Reuchse, who asked me to ring them (in the US!) as it was too difficult to explain in an email. I note that your schedules are also different from Kilncare, and Warm Glass. Shall I just trial the ones that cam with the kiln? Its to fire Reusche glass paints – black and bistre.
Many thanks,
your website looks very interesting and the sleeping squirrel is beautiful.
Claire
Yes, each kiln is different with slightly different behaviours. Some people fire a bit hotter and some a bit lower but this schedule above is a good starting point.
Sorry for the delay Claire… your question got ‘lost’ and I’ve only just seen it. You’ve probably got the hang of this already!