Weatherproof Your Stained Glass Panel
Up until now, your panel has been a bit delicate and easily harmed. The cementing stage will make it strong and waterproof.
A black putty mixture is pushed under the lead came, which hardens to make the stain glass panel firm.
Click here to go to recipes for making your own stained glass cement
What You Need

- Tub of black cement
- Piece of toughened glass or a board for mixing
- Mixing knife
- Fid
- Latex gloves
- A couple of scrubbing brushes, nail brush or old toothbrush 6. Whiting (chalk powder)
- Dustpan and brush 8. Newspaper 9. Dust mask.
If you want to mix your own cement, replace the ready-made black cement with:
Mineral spirit (White spirit (UK) = Mineral spirits (US, Canada) = Mineral turpentine (AU/NZ). Generic name = paint thinner), Linseed boiled, Whiting (chalk dust) and Lamp black or black poster/powder paint. The recipe is below.
If you’re new to using lead came as a technique I would highly recommend you give it a try. It will add a great deal to your skill set and give you the best of both stained glass worlds – foil and lead.
If you don’t have a local class my Leaded Stained Glass Artistry course has taught many people – even those who have never used lead before – how to make a stained glass panel using lead came. The course is self-paced and online so you can learn this lovely technique even if you are unable to get to a class. You can find out more about it here Leaded Stained Glass Artistry.
Cementing A Lead Came Panel
1. Mixing The Cement
If you’re going to do a lot of lead came panels, it’s cheaper to make your own cement (see below). Otherwise you can buy a pot of ready made black cement at any stain glass suppliers.
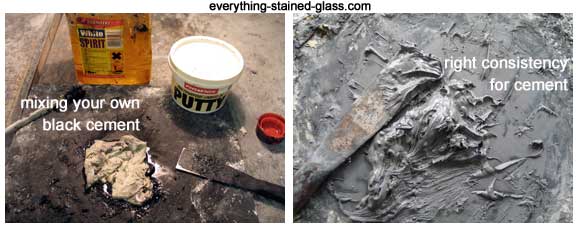
– The ready made cement has to be mixed for about 15 minutes. It’s easier to take some out and mix it with a strong knife on a board.
Mix Your Own Cement Recipes
If you make leaded stained glass you can save lots of $$ by making your own putty for stained glass. Make sure you just make the amount you need as it doesn’t keep. I have 2 recipes here for you to choose from, one with and one without mineral (white) spirit.
The main ingredients for leaded light cement are boiled linseed oil and whiting. Boiled linseed oil dries quicker than linseed oil – hence its inclusion in the recipes.
Mineral spirits also help accelerate the drying process but aren’t essential. They help if you have a quick turnaround on the panel and want it to dry quicker. I add 5-10% white spirit (mineral spirits).
You might want to do one with, one without, to see which you prefer. It’s not going to do any damage so good to experiment to find your own preferred way.
Cement Recipe 1
1/4 cup mineral spirit (white spirit)
1/4 cup linseed boiled
2 cups of whiting
Spoonful of lamp black or black poster paint.
Cement Recipe 2
Alternatively you could try this one as a starting point. Be prepared to experiment:
1 oz = 1/8 cup of boiled linseed oil
1 oz = 1/8 cup of raw linseed oil
4 oz = 6 Tbs whiting. 6 Tbs is runny; between 8–9 Tbs is thicker.
Mixing Method
- Add whiting to the linseed oil and mineral spirits (if using).
- Mix, either by hand or you can use an old mixer if you have one with a bread hook. Don’t bake it!!! Add more whiting to get the preferred consistency. Add more whiting if you prefer your cement thicker. You don’t want it to be too thick (think PlayDough). Once mixed it needs to be of a consistency that’s easy to push under the came.
- You don’t want it too stiff otherwise it’s difficult to push it under the flanges of the lead.
- When it’s mixed together, add a spoonful of black powder paint. This is to colour the cement it has no other function.
2. Brushing Cement Under The Stain Glass Lead Came
- Place your panel on some newspaper.
- Using either an old toothbrush or a scrubbing brush, start pushing the cement under the leaves of the lead. Plastic nail brushes are great for this.
- Work the cement in across the leads. If you brush up and down the length of the lead you will remove the putty you’re trying to put in.
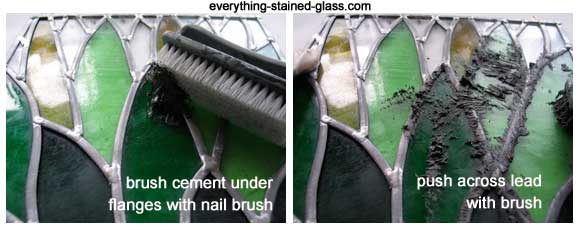
- Don’t worry if you get more black cement in one side than the other, it’s normal and adds to the texture of the panel.
- If you have enough time, it’s best to cement both sides at once and clean up afterwards.
- You can do one side at a time as long as you clean it thoroughly before stopping. If you leave the cement on too long it starts to harden and is difficult to clean off the lead came.
3. Trapping The Cement Under The Lead Came
- Scrape away the excess cement with the fid. This can be reused if sealed tightly in your putty pot.
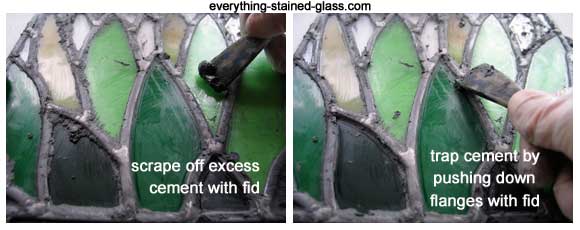
- Use the flat end of the fid and gently push down each side of the lead onto the glass.
- You can break your glass at this point, so don’t push too hard.
- Don’t worry too much with this if you’re using narrow lead – 3/16 (5mm) – as there’s not enough width to push down.
4. Cleaning Up
- Sprinkle with whiting (chalk dust) and rub over the whole panel so the chalk dust absorbs the linseed oil.
- Trace round each glass shape with the ‘beak’ of the fid to loosen the spare cement.
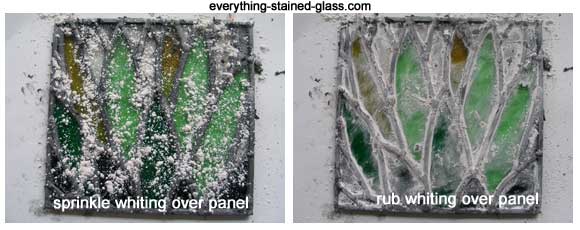
- With firm pressure, brush this spare cement off with a scrubbing brush. If you can find one with short bristles they work very well. As above, brush across, not along the length of the leads.
- Make sure you get all the putty off the lead came before it hardens and becomes tricky to remove.
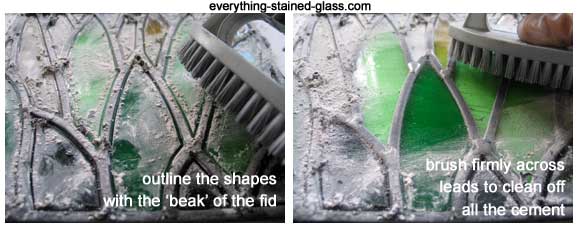
- Turn the stain glass panel over and do the same on the other side.
- Some of the putty will squeeze through, but don’t worry as you are yet to do the final clean.
5. Drying The Cement
- Once you’ve cleaned all the leads and glass with the whiting you’re finished for now.
- Leave the stain glass panel for about three days so that the cement can dry and harden.
Helpful Resources
Here’s a 48 second video showing how to cement stain glass. There’s a couple of things to watch out for:
- Usually the cement is a bit runnier than this.
- Using a knife isn’t recommended, as you might scratch the glass and it’s not very flexible for pushing the cement.
But all the same, it might be helpful and give you some idea of the process.
Short video showing how to cement a stain glass panel
Once your panel has dried for 2-3 days you’re ready for the final stage Cleaning and Polishing.
A few thoughts:
I premix the dry and wet ingredients. I have a bucket of mixed whiting and black oxide (I think this is the same as lampblack and bone black), and a bottle of boiled linseed and turps in the right proportions. It is a simple task to mix these in a pot until the consistency is right – something you soon learn by doing!
I endorse not using plaster of Paris or cement. I used to include both in my recipe, but then I had to dismantle one of my own 20-year old windows. After that, no more plaster or cement!
Whiting is powdered chalk, that is, calcium carbonate. It doesn’t contain silica, so doesn’t cause the silica-issues in the lungs. That said, avoiding breathing dust in any form is always a good idea.
Once I’ve finished puttying and scrubbing, I like to wipe the came with a turps-dampened rag. It removes any of the putty that is still stuck to the came, and helps make the surface a bit smoother.
As for cleaning the brushes, I wash mine out in turps. Afterwards, pour the filthy turps into a large jar with a lid and leave for a few days. The whiting powder will settle to the bottom of the jar leaving clear (but slightly coloured) turps above. This can be poured of and re-used, while the sediment can be dried and discarded. (The same turps-recycling trick can be used with paint brushes.
Such brilliant tips Geoff, thanks so much for taking the time to write them all out for us all. Much appreciated.
How you remove dried putty from lead cane?
It’s a bit tricky if it’s been allowed to dry Ron. You’ll have to painstakingly pick it all off – wooden skewers are good for this 🙁 Good luck – listen to an audio book or music while you pick away!
Hi, Milly. I’ve been making my own cement – advice from a local professional stained glass artist – but use an actual cement mix and just add water and Lindseed oil. It works well but I have to make sure the edges are cleaned within a day so it’s easier to do. I use the tip of a metal nail file which is just dull enough to not scratch the glass but gets through the dried cement. I never thought to add a color to the mix. The cement dries a little bit too light so adding a touch of black would help that. Any thought on using cement powder instead of whiting powder?
I’ve always avoided cement Polly, as it dries like a rock. It’s really only a problem if it needs to be restored further down the line. I know everyone swears by their own recipes so see how it goes and whether it suits you.
Hello!
I’ve been using your site to answer some of my questions and help with my issues as I go through my journey of making stained glass. And let me just say your site is so helpful! I am currently at an impasse with this one issue I’m having, my cement is not drying for some reason…it has been a little over a week now and it is still mailable, I can tell has dried a bit but it seems to be taking much longer than what I am seeing around the internet. I purchased the brand Pacific Putty and it does not come with instructions, so I’m not sure if this particular putty takes longer to dry or what the issue is. When I went to use it, it was pretty hard, kind of like a harder play dough consistency, so I used some mineral spirits to get it to the correct consistency and then cemented 2 panels with it. Am I doing something wrong?
I have seen others that have this problem. You could try more whiting and leave it on for a day to see if it absorbs the excess oil. If it’s humid it may take longer; they do vary.
It just needs to be absorbed.
I hope that reassures.
Hi there, love your site. I started using H came for projects to hang inside the window. I always frame them with zinc. Do I need to cement always. My problem is arthritis in my hands. I love working with H came but just cannot do the putty or cement. What do you think?
No, you don’t need to cement if you’re making a free-hanging panel DonnaMarie. Just frame with lead or zinc and hang.
Thanks for your kind comments about my site 🙂
I am amazed at how much information you are sharing on this site. I have done a number of intricate foil stained glass windows but now want to try came. What an absolute joy to find your site. I feel like I need to send you some money for all the tutorials or at least buy stuff from your links. I hope you get a commission from Amazon.
Oh that’s so kind of you Michael, thank you 🙂 I don’t know how far in to your lead came explorations you are, but if you’re early on, you might want to have a look at my online course Leaded Stained Glass Artistry. As it happens, I have a (rare!) 20% discount off all my classes this week.
If you think the course will help you, use the Coupon Code TREAT20 at Checkout. The offer ends this Sunday, 14 November 2021.
Thanks again for your special words.
Hi Milly, Hope you are well (we met on a masterclass at the Warm Glass studio many years ago! :)) I have for the first time made my own cement, but I put 1 cup of plaster of Paris in with 1 &1/2 cups of whiting, as well as the other ingredients. Will this cause a problem? Will it be okay outside in all weathers? (only one side has this cement, the other side has shop bought) I will in future omit the P of P!!! Kindest regards, Carole
Hello Carole, I so remember you. That was a fun class 🙂 I avoid P of P as it sets like a rock. Probably okay for you but murder for those wanting to preserve your work as you go into the annuls of history 😉
SUGGESTION: I use the pointed end of a wooden golf tee to get the extra cement off- running it around each glass piece. They work very well and are easy to grip.
Thank you for this Golfers Tip Dale 🙂 Much appreciated. You’ll have to watch out for those stained glass thieves on the golf course LOL.
I am also a potter and mix my own glazes. I was glad to see the suggestion about wearing a mask due to the airborne dust particles from the whiting which contains silica. And while we all have masks these days, a cloth mask will not cut it! Wear an N95 mask! And don’t freak out because this would be a short, very infrequent exposure that truly is a very low risk – it takes a lot of exposure to develop silicosis, but some folks may also have other underlying conditions – so use common sense.
I also want to suggest mixing in the colorant powder with the whiting up front as we do with pottery glazes, it simplifies the procedure and gets more uniform results quickly. You can add more to deepen the color if you like at the end, and make note of your results to refer to next time! Happy creating everyone!
Thanks for your very informed comments Diane. I love the idea of mixing the powder colour with the whiting, not at the end. Why oh why didn’t I think of that?!!
Love you sensible approach to health and safety too 🙂
Milly, if you never wash your panels how do you clean the flux off?
I just find it easier to stand my panel in the shower and brush it with flux remover and then shower it down with the hand shower.
Thanks for your reply
This is lead panels, Emerald. I do wash foiled panels, although these days not even that really – I use Kwik Clean (paid) – it’s so much less hassle!
With lead I use whiting and a brush to absorb the oil in the cement, clean the glass and flux. See the tutorial above.
I hope that explains my method 🙂
HI, I didn’t wait long enough for the cement, the tub said “wait 24 hours” and I did. Then I washed it to ready for patina and the cement probably wasn’t dry enough as it appeared to ooze out…..so, should I wait a few more days or is that cement “ruined”? Advice? Thanks
Julia
When you say ‘washed’ what do you mean Julia? I never wash leaded panels. I clean up the cement with whiting as per this page and then wait for the cement to dry out. You could try whiting now, it helps dry out the cement.
Good luck!
Hi,
I have diamond window panels…the cement needs to be re-done…how much of the old cement must be removed?…scrape just loose, dig everything out?
I’d always prefer to get it all out, otherwise it can dislodge and disrupt the new. Try soaking it in ammonia for a couple hours, then pick it out with a hook tool. I hope that helps Tom.
How do you clean the cement off the brush you used to apply the cement to the panel.
It is a bit of a pain Karen. When it’s dry, find a rough surface (something like a big rock, hidden brick wall) and vigourously brush it to remove most of the dry putty. Then get the remainder out by brushing it with another bristle brush.
I’m a bit confused. The recipe calls for One part mineral spirit
One part linseed boiled
Seven parts whiting
Lamp black or black poster paint,
but there is a picture of a jar of putty in the #1 Mixing the Cement instructions. Do you mix all of the ingredients into the putty? And if so, what would be the proportions of putty to the other ingredients? And is there a specific kind of putty to use?
Thanks for your help.
Good question Jane and one that I need to clarify… the photo is the quick way – the recipe is for mixing your own from scratch so ignore the putty photo.
Thanks for pointing it out.
Hi Milly,
I too have been doing stained glass for over 25 years and I never knew about making your own cement. THANKS! It’s a game changer!
Denise
Oh great Denise! It helps to be able to mix the amount you need to the consistency you like.
Denise, that was me, Milly, commenting above, I accidentally used the incorrect login. Sorry!
Milly, I’ve got linseed oil putty. Can I use that to make my own cement if I mix it with white spirit and some black acrylic paint?
You need the following: 1 oz = 1/8 c of boiled linseed oil
1 oz = 1/8 c of raw linseed oil
4 oz = 6 Tbs whiting
Add lamp black ‘to taste’ how gray or black you like your cement.
Boiled Linseed Oil has a drying agent in it so it dries quicker (24 hours) than Raw Linseed Oil (3-4 days).
I hope that helps, good luck Clare.
I’m starting stained glass after taking classes more than 30 years ago. It’s a learning process again. If I’ve done a foiled piece and the perimeter is lead came do I use the black cement on the lead parts? Will the cement hurt the foiled parts? Thank You.
If it’s an internal hanging panel you don’t need to cement Cathy. If it’s being fitted into a window aperture, yes, cement the lead perimeter first, clean up and then patina the foil. It’ll be fine. Good luck!
I want to patina the lead cames within my panel and the zinc came framing the edges. Should the patina processing be done before or after puttying?
After. The puttying is messy and needs a lot of cleaning up. Once the panel is cleaned and picked out you’re ready to patina. I hope that helps.
I live in a Central American country where glass supplies are not readily available. Cementing glass is a challenge because of the materials we DON’T have. It has been suggested that plumbers putty will work. It is pliable and fairly easy to apply but I would like to make it a bit more liquid and black. It is a light tan color and it does not harden. Can you suggest what I might mix with the putty to make it easier to apply and color? Thanks.
White spirit/Mineral spirit. Try to get the odourless type, it’s less harmful to your lungs. You can use powdered poster paint to make the putty black.
I hope that helps Steve.
What are the health cautions in working with the cement and the whitening? Indoors or Can it be done in cold garage 40 degree damp garage?
You need to wear a mask to prevent breathing in dust particles. The cold garage is fine; the cement will just take longer to set. Good questions, thanks Jean.
Hi Milly,
So far I’m reading cementing textured glass the best thing to do is to mask off most of the glass so cleaning won’t be a nightmare. Any further suggestions?
Thank you,
Carol Coffin
It depends what type of texture the stained glass is… if it’s texture without sharp edges you don’t have to mask; a stiff brush will clean it perfectly well. If it’s the type of glass that has especially deep or ‘sharp edged’ texture, then you’ll need to mask it, yes. It will save you a lot of time further down the line. You don’t want to be picking out putty for hours…
Hope that helps Carol.
I find that the one texture that I HAVE to mask is glue chip. If I don’t mask it it ends up grey, without a sparkle.
Absolutely spot on Geoff, thanks for adding.
I use a rubber door stop instead of a metal putty knife to push the cement into the lead cam
I’ve never heard of that Steve; ingenious! Sounds much less harsh on the came. I use brushes – bigger bristle ones or toothbrush for fiddly hard to get into bits.
Thanks for adding your tip.
If I mix my own cement, does the glass need to start out dry? I just washed it and ready to start cementing.
Hi Laurie. Yes, they have to be totally dry before you cement them. I never wash my leaded stained glass panels. I clean the glass and lead with brushing whiting all over the panel. I hope that helps.
As usual your Instructions are detailed and great!
Thank You!
Thanks Mitzi, glad you find the tutorial helpful.
Hi, thanks so much for your tutorial. I’m just wondering what you use to clean the brushes after you’ve used them to push the cement into all the leaves? Or are they a write off?
No, not a write off. You can sit your used brush in water so the bristles are submerged in water. Usually it’s still pliable the next time I cement for use.
Alternatively you can keep it submerged in white spirt but I find this a bit wasteful and smelly.
I use two brushes, one to apply the cement and the other to clean it off. The brush I use to clean becomes my new cementing brush when the other one is done.
Good question Chris, I hope that helps.
All good advice .In the past we used to add Red Lead to the mix too.This is no longer available to the public.Dont use plaster of Paris as this will prevent the mix from staying flexible and will compromise the seal .
Yes! I had a pot of red lead, too. I can’t believe what other dangerous stuff we handled and did but I’m not sharing on here LOL.
can i just ask a question, when mixing your own cement, what is the whiting i use in the mix, is it just chalk dust or plaster of paris?
The whiting I use is chalk dust Barbara. I wouldn’t put plaster of Paris into the cement, it dries like a rock – eek. Good luck.