Glass Slumping Tutorial
Slumping glass describes the process of melting a piece of glass into a mould in a kiln. Often, but not always, it is a piece of fused glass that is then slumped to form a bowl or a plate.
Fusing and slumping are two separate processes that have to be done in order. The flat fuse is first, as the glass needs to be heated at a higher temperature than for slumping. Usually, you start with the hottest and move to the coolest process when firing glasswork.

Glass Slumping Process
1. Flat Fuse
– Before you start making your fused piece, you need to have chosen the mould you are going to use. This will make sure that you design and cut your glasswork to the right size.
– Once fused, the glass needs to fit to the edges of the mold. If it hangs over more than 1/4″ (6mm) it runs the risk of cracking during firing.
There’s a detailed tutorial on fusing a coaster, including a fusing kiln firing schedule here. To adapt it to suit your current project, simply measure your mold and design something to that size and shape.
When you’ve done that, you’ll have a flat fused piece of glasswork – sometimes called a ‘blank’. Now you’re ready to shape it by slumping.
2. Preparing the fused glass molds
– Stainless steel and clay molds will need to be covered with kiln wash before firing. This will stop the glass from sticking.
– The primer comes in powder form and is mixed with water at a ratio of 1 (powder) : 4 (water). Shake it together in a jar.
– Using a haike brush, apply a thin layer of kiln wash across your mould. Wait for this to dry, then apply another layer across the existing layer. Do this 4 times, and make sure that the kiln wash dries thoroughly. You can speed the drying up in a kiln at 500F/260C if you’re impatient to get on!
– Here’s a video showing how to put layers of kiln wash on a mould. It’s good to get in the habit of doing this as smoothly as possible, as the artglass may pick up textures during firing.
Video showing how to apply kiln wash to a mould
Before loading the kiln, make sure your fused ‘blank’ is spotlessly clean. Any greasy marks will fire permanently on.
Check that the air holes in the mould are free from kiln wash.
Kiln Firing Schedule
When firing glasswork that has already been fused, it’s a good idea to slow down the heating process. This is because glass becomes a bit more temperamental once it’s been fired, or if there is more than one layer.
– This is a generic firing program for slumping a fused blank 1/4″ (6mm) thick in a shallow, smooth mold.
– As with any firing cycles, it is just a recommendation to get you started. It will probably need adjusting to allow for different kiln behaviours, the types of glass and shape of the mold.
– Shallow moulds need less heat and soak time.
Segment 1 – 300F/167C per hour to 1100F/600C
Segment 2 – Soak for 10 minutes
Segment 3 – 100F/56C per hour to 1150F/620C
Segment 4 – Soak for 30 minutes
Segment 5 – As fast as possible to 960F/516C
Segment 6 – Anneal soak 30 minutes
Segment 7 – 150F/83C per hour to 750F/400C
Turn kiln off.

Keeping A Log Book
Keep notes about your firings, including the type of glass, process used (eg fusing), size and thickness of piece and the firing schedule.
Write down your observations after each firing, so that you can learn from your mistakes and your triumphs!
Troubleshooting
My piece has cracked during firing!
This could be one of two things – annealing problems or incompatible glass.
– Annealing cracks are usually ‘S’ shaped, and can stop in the middle of the glass.
You can re-anneal, increasing the time at Segment 6 and slowing down the cooling rate at Segment 7 (above). Cracks will become less visible but won’t disappear altogether.
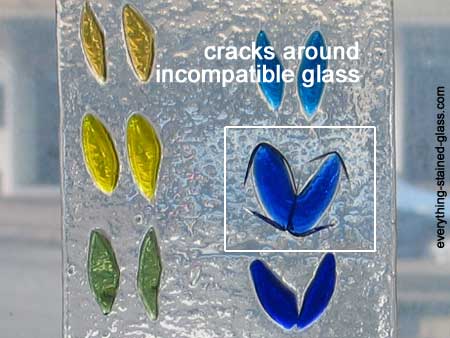
– Cracks caused by incompatible glass either break around the piece of incompatible glass (see photo above), or crazy paving cracks all over the piece. This can’t be rescued, I’m afraid.
Labelling and storing fusible glass with it’s own ‘family’ in your workroom might prevent it happening in the future.
I have unwanted bubbles in my artwork!
Bubbles are caused by trapped air.
– You can try and design them away, by making sure you don’t create air pockets in your pattern. Avoid putting tiny pieces underneath a large piece of glass, the air won’t be able to escape.
– Or try lengthening the time of the bubble squeeze (Segment 2, above)
There’s horrible white ‘misty’ patches on my fired masterpiece!
This is devitrification, the result of crystals forming on the surface of the glass during firing.
– You can reduce the chances of devitrification by cleaning your piece meticulously, and by using a devitrification (‘devit’) spray before fusing.
– Alternatively, you can lightly sandblast the surface and then fire polish the piece.
My slumped bowl is wonky!
– Try slowing the firing down and reducing the top temperature, as a crooked slump is often caused by firing too quickly and too hot.
– Check that the mold is level in the kiln before firing.