Outlining Your Design
Stain glass painting opens up an exciting number of options for you. Once you get the hang of it you’ll be able to add detail, texture and colour to your stained glasswork.

Starting with line work is best, especially for beginners, as it can be fired first to give you a permanent reference point for the matting (or shading) that you do later.
Stain Glass Painting
What you need- painting checklist
Palette, Palette knife, Water, Paint, Gum Arabic, Pipette, Painting brushes – the thin brushes are known as ‘tracing brushes’ – size 3&5 are good for beginners, A light box, Bridge or armrest.
1 Cleaning your glass
Glass paint will gather in blobs if the glass is dirty or greasy. You can clean it with rubbing alcohol – isopropyl is the best cleaning agent. Almost as good is a smear of your mixed paint on a tissue and rubbed over your glass.
2 Getting the consistency right

– Add some water to the edge of your mixed paint until it’s the consistency of thick evaporated milk.
– It’s crucial to get this right – my students often try to start glass painting with paint that’s too dry and find that they run out of paint or their lines are uneven.
– Too thick an application will result in blobby paint that blisters in the firing. Too thin and it fires off.
3 Start stain glass painting
Traditionally people did their tracing (line work) by following a what was called a ‘cartoon’ under their glass, but this may not suit you if you work in a more spontaneous manner.
– Charge the brush by twirling it around in the paint.
– Hold the brush in a perpendicular position gently between forefinger and thumb and rest your palm on the bridge.
– Off you go! Don’t expect to get it right first time, it takes time to get used to stain glass painting.
– Try pressing lightly and using just the tip of the brush.
– Then try moving the brush quickly and slowly, to get an idea of the different marks you can make.

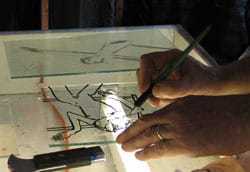
This photo shows artist Mark Angus using the whole length of the brush to make a stroke.
– Have a go at that too. See how far you can go without running out of paint.
– As water dries quickly, you’ll have to learn to keep going until you’ve finished – once the paint has dried it’s difficult to seamlessly add to it with wet stain glass paint.
4 Correct or enhance paint lines with a needle

– You can easily tidy up lines with a needle pressed into a brush handle.
– You can work into your lines with a needle to enhance your stain glass painting.
– You can really have fun with this – scratch patterns in or add detail – for example making hair ‘hairier’.
5 Final clean
Greasy fingerprints will fire in permanently, so you need to make sure your glass is free of them and any unwanted smears of paint. You’re now ready to do your initial firing.
6 Firing your stain glass
Assuming it’s simple paint mixed with water, I’d recommend the following kiln firing schedule:
Segment 1. 570F/300C per hour to 1220F/660C (matt finish) – 1250F/675C (shiny finish). Soak 5 mins.
Segment 2. Full to 1040F/560C. Soak 5 mins.
Segment 3. 50F/10C per hour to 986F/530C. No soak. Off.
Helpful Resources
This is a really good 5 minute video that takes you through the whole process of stain glass painting a face.
It might be a bit off-putting as it’s quite a difficult subject, but you could try using the techniques on an easier drawing first.
Video of traditional stain glass painting
Once you’re happy with your line (or tracing) work, and have fired them permanently, you can move on to Blending Paint.
If you are just getting started there is this Peter Mcgrain Deluxe Paint Starter Kit (paid link)on Amazon

Hi Milly, I love your website:)
It is so informative and easy to understand for a novice like me!
I have a question about multiple firing.
Dose the glass paint on the first layer melt again when we fire it repetitively for the 2nd (or 3rd, 4th….) layer if it is done at the same or higher temperature? Or once it is fired to be permanent, it just won’t melt anymore?
I use ordinal black powder paint mixed with gum arabic and water which usually be fired at 550c.
Thank you!
Only the newest layer will reduce in density – the fired paint stays stable if fired at the same temperature. Start with the hottest firing (paint) and reduce to the lowest (stain) – you don’t normally go higher. Good luck.
Hi Milly
I’ve just bought a 2nd hand ‘good’ kiln. I’m not sure if you are saying I should do all 3 segments. Segment 1 I understand but do I have to do segment 2 and 3 for the same firing.. and if so…how? And ….when do I put the bungs in or out ?? Hope you can help. I’m really muddled.
It is confusing when you first start using a kiln. I use all 3 segments for larger pieces that need to cool down slowly. For smaller pieces you can set it to top temperature and then simply turn it off when it reaches it. Leave it to cool right down; the danger is thermal shock (= cracking)
I hope that helps a bit Dee, and good luck.
Hi Milly. What a great website you have, and thank you so much for sharing your knowledge. I am just starting to practice with painting stained glass with Thompson Glass Painting Enamel. I am sifting the enamel powder lightly on the glass to create a shaded look. I run the temp up to 1220 slowly, soak for 10 minutes, then off and let the glass cool to room temp over the next 6 hours. What I am finding is that the enamel is fusing very well, but it is glossy…it actually sparkles! I am looking for matte/flat. What should I try next?
You can try knocking a bit off the top temperature and see… If that works in terms of matte but is less stable, increase the soak by 5 mins. Experiment with test pieces before committing!
Well, I’m starting to think that maybe the Thompson Enamel is naturally glossy. I have experimented with top temps from 1140 to 1240 and long to short soak times. It always ends up glossy. Milly, can you give me a recommendation of a black enamel powder that is not glossy that I can experiment with? Even the Reusche paints are listed as gloss to semi-gloss. I am confused. Thank you for your assistance!
I’ve achieved some very matt looking Reusche at lower temperatures Jim but it’s more stable when it’s fired to a shine. Good luck with your quest.
Hi I am relatively new to glass painting and my pieces come out very splotchy and some areas are dark other areas look light and some are bubbly. Is there a way to send you a photo of my pieces? Maybe you can help figure out the problem. I’m sure it’s probably something to do with mixing my paint. Thanks
It sounds as if you might be firing it too high if it’s bubbling. Too much heat can also cause the paint to fire away. Or not enough binder. I hope that helps, Milly.
Hi
Thanks for your useful website. I am a complete beginner with painting glass and using a kiln. I just bought an Olympic kiln , I have painted some pieces of glass with black reusche paint then scratched designs in using the sgrafitto technique . Now I need to fire them but don’t know which schedule to use . The paint supplier recommends rapid initial heat 9999c to 680c and hold for 5 mins then let it cool to room temperature. Sorry for my ignorance but does that mean I just need 3 segments ? Many thanks for your help.
ooh lovely, Reusche paint :-). What you’re describing is 2 segments – the heating up (Full to 680) and soaking (5 mins, top temp). ‘Letting it cool’ means turning the controller off – as it doesn’t have a job of slowing down the cool. Hope that makes sense.
The more complex firings are always associated with fusing or casting – lots of ramping up, controlling the descent and soaking at various stages.
Am going to try painting on glass using Reusche tracing black and bistre brown. For it to be fired, can any thickness glass be used? Thinking of using a 3mm piece. Would the schedule above need adjusting? Seem like ‘silly’ questions to ask but if you could advise, I’d be most grateful. Up for experimenting but obviously they’re very expensive experiments! Thank you.
It’s a good question Gino. Yes, any standard glass thicknesses are okay at this temperature – 3-6mm. Good luck.
What stained glass are you firing, as a fusion artist I thought the that you couldn’t fire stained glass.
Good question Sheila. It’s regular art glass, not fusible. You can fire any glass but can only FUSE compatible glass. The firing of paint pigment is very low compared to that of fusing – 600-650 C – and I’m firing single pieces, not fusing them together. I hope that explains it.
I had the same question. I have a kiln and can fire painted stained glass pieces. Can you give me a rough ballpark for a firing schedule?
Cynthy Roethel
Yes there’s one above under 6. Firing your stained glass. I hope that gets you started Cynthy
I am very much a beginner in stained glass but am willing to try anything new. I love it! I use the foil method.I want to make a monarch butterfly as part of an 18 inch round panel.My concern is how to make the white dots on the black parts of the bug. Should I paint them or use frit and attempt to fire them in?
White paint is probably your best best at this stage unless you have a kiln and know about fusing glass and compatibility issues? You can get semi-permanent paint which fires in a domestic oven.
I love your ‘go for it’ approach Terry!
Hi Milly-
It’s me again…. needing some information on permanent/semi permanent paint or ink for fine details on my finished stained glass pieces. I’ve read that it can be set in regular oven at 170 degrees farenheit. but no brand or name of the paint was given. It would be great if you knew of a brand that works well. I’ve seen some beautiful little birds with detail spots on wings and also butterflies. The Owl I saw had the face painted in detail looking so real. Please help. OK?
Pebeo 160 paint do a range that work by being baked in the oven Dottie. You can get all sorts of colours but worth testing as some don’t show up in certain glass/paint colour combinations. Black is safest!
It’s semi-permanent.
I hope that helps.
I fired some Heusche RE1333 red for flesh on flesh colored stain glass at 570 degrees F / hour up to 1250F, held for 5 minutes then lowered down to 1040F, held for 5 minutes, lowered to 986F, no hold, and then cooled as fast as possible. The paint is severely faded. I painted one piece over again and fired again at 1200F. Same problem. I am using a large Paragon pottery kiln with a Sentry 2.0 controller. Any ideas why my paint is fading?
I think 1250F is too hot as a top temperature Joseph. But then I see you’ve tested at my recommended temperature – 1202F (650C) – and are still having the same problem.
Fading normally does relate to the kiln being too hot, so you could do some test pieces reducing the heat until you find the correct top temperature for the combination of your kiln, the glass and pigment. You might also try going up to 932F / 500C slowly and then As Fast As Possible to the top temperature. The slower your ramp is to top temperature, the more exposure to heat the stained glass paint receives on the way up.
You can also try without a soak at top temperature to reduce the amount of heat – lots of options and variations!
There’s always a degree of testing to be done to find the optimum individual firing schedule I find. Good luck.