Polishing Lead Came
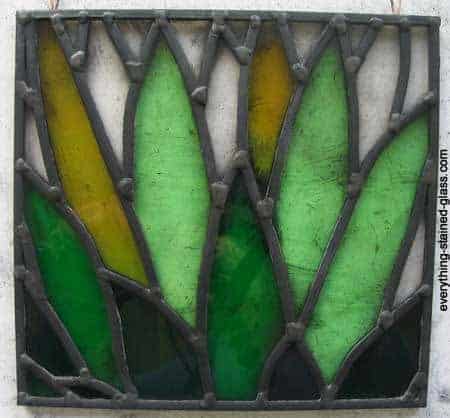
The final step of stained glass making really adds class to your panel. It is done after the black cement has dried and hardened.
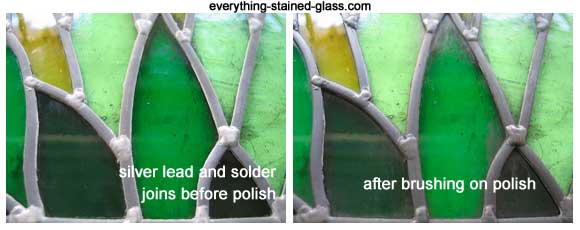
The cleaning gets rid of any black cement that has squeezed out from under the lead came during drying. The polishing blackens the lead and the solder joins and makes the whole panel sparkle.
What You Need
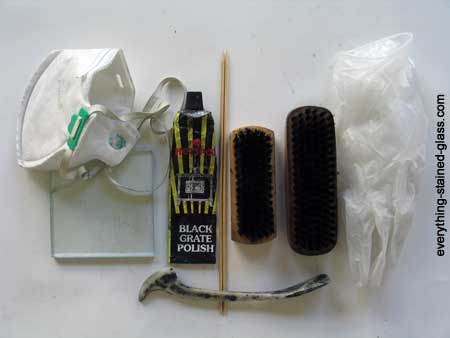
Black graphite polish (grate blackener) available from stained glass suppliers, two shoe brushes, fid, wooden skewer (or similar), dust mask, latex gloves, newspaper, dustpan and brush.
Stained Glass Making – Final Clean and Polish
1. Picking out
How far you go with this process is up to you. Some people spend ages on it, others prefer the ‘softer’ look of a leaded panel that has rounded puttied corners.
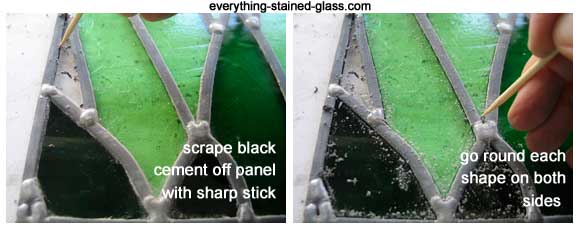
– Trace around the shapes with the wooden skewer.
– Use the fid to remove any hardened black cement that has squeezed through during the cementing process.
If you’re new to using lead came as a technique I would highly recommend you give it a try. It will add a great deal to your skill set and give you the best of both stained glass worlds – foil and lead.
If you don’t have a local class my Leaded Stained Glass Artistry course has taught many people – even those who have never used lead before – how to make a stained glass panel using lead came. The course is self-paced and online so you can learn this lovely technique even if you are unable to get to a class. You can find out more about it here Leaded Stained Glass Artistry.

– Brush off any dry bits of cement.
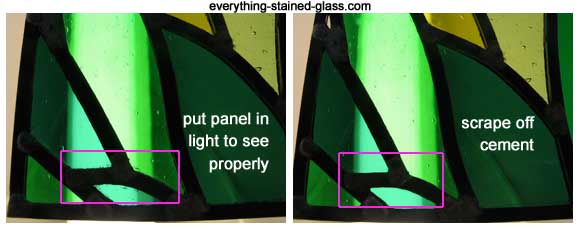
– Hold the panel up to the light or put on a light box to make sure you have scraped off all the cement.
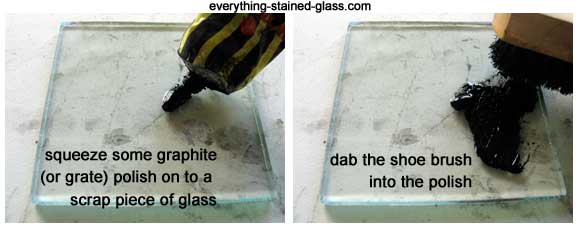
2. Blackening the leads
– Squeeze a bit of the black graphite polish onto a piece of scrap sheetglass.
– Dab one of the shoe brushes into it. You don’t want to get too much on to the panel.
– Brush along the lead came, taking care to cover the solder joints.
– Leave for half an hour to allow the graphite polish to dry.
3. Polishing the lead came
– Take the other (clean) shoe brush and brush both the stained glass and lead came.
– This needs quite a lot of effort. Work at it until you can touch the panel without getting black fingers.

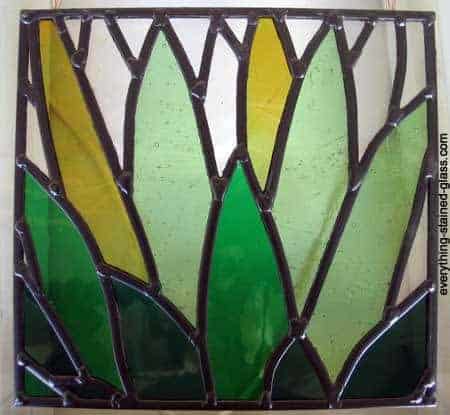
That’s it. Everything is shining and your stain glass panel is finished. All that’s left to do is hang it in the window and invite everyone round to your house to admire it! Big congratulations 🙂
I have made a leaded stained glass window and have put patina on the lead. It all looks a little dull so should I wax the finished window?
I don’t wax leaded panels Tracey, I shine them up with black stove polish and they come up really black and shiny.
Never heard of this Black Graphite Polish. I think I’ll see if I can find it, and give it a try. -Question is…. Do I use the Black Graphite Polish AND a good car Polish?
Thanks Helga
The Graphite is for lead only Helga. It’s the final step, to make the clean lead came black rather than grey. It’s optional.
I don’t polish lead came with any polish, I use whiting to clean both glass and lead.
I hope this helps clarify.
Is it possible to wash the glass after polishing? I find my polish gets into cracks in my antique glass that I really struggle with getting out. Do you have any advice?
I wouldn’t wash after waxing Helen. You can pick it out with a wooden skewer. I’d watch out for spending too much time on things that people won’t notice though; they’ll see the gorgeous glass 🙂
One of my “students” wants to know if this can be used on on a copper foil project?
No, it’s for lead only.
Hi Milly,
As a newcomer to your website I have been looking around and having fun gathering tips and ideas. When I learned leadlighting 30 years ago, my teacher recommended polishing lead came with a simple mixture of powdered graphite and methylated spirit. Shake the bottle, put a few drops on a natural bristle brush, and brush away! I’ve been using this ever since, although I do tend these days to patina the solder joints first. And I rescued an old electric floor polisher from the rubbish dump, which makes life a lot easier and quicker for large panels!
I love the way that every task has multiple solutions, and how this is such an experimental and hands-on craft.
What great ideas Geoff, thanks for sharing. A good find at the dump I must say 🙂
I’ll have a go at the graphite and methylated spirit if I can stand the smell, I’d not heard of that. Always learning, as you say – the joy of stained glass.
Yes the old floor polisher can also be use with the bristle pads to cement larger panel and then clean & finish with the finer pads, saves heaps of labour time. JH
where do you buy Black Grate polish in USA
You should be able to get it from Amazon Peter – go to this page and scroll down to the Lead Came Tools and Materials section:
https://everythingstainedglass.com/recommended-tools
Hi Milly,
Where can i get the black graphite polish for lead. I’m from quebec, Canada. Can i order it on Amazon? Thanks!!
Have you searched for it Annie? I can’t search Canadian Amazon as I automatically get results for the UK 🙁
Milly, when I use black patina, polishing leaves it dark brown at best. Would like polished black!
Have you tried experimenting with the materials you use Maury? Different patinas give different results. I find Novacan a good one.
I am curious I am new and use mostly textured glass will i still succeed at using putty on my glass panel?
It’s a bit of a ‘yes’ and ‘no’ answer, Helen. No problem with the putty going in and around the lumps and bumps to weatherproof the stained glass…but potential problem with putty getting in the texture and being hard to clean with the whiting.
If you’re using a texture that looks like it might cause cleaning problems, you can stick contact paper on the glass to protect it. Or masking tape or similar.
I hope that helps.
FINE WIRE BRASS BRUSH
Hi There,
Looking for a recipe to make a graphite black polish. Commercial is lacking consistency.
Cheers Garry
That’s a novel thought Garry. I’ve never made my own graphite polish. Know what you mean about some of the makes – a bit runny. Sorry I can’t help you this time – anyone else?
Hi Garry
Did you get the recipe and if so would you mind sharing it with down under in New Zealand?
Thanks
Mark
Hi Milly,
I love your site–I refer to it often! Will the black polish also work on zinc came? Can my glass piece still get wet if I use the black polish, or will it wash off? Lastly, if I leave it gray without black polish, is there another type of polish I can use to make it shine?
Thanks!
Thanks Dan, good to know. No – the stove polish is for lead came only, not zinc nor soldered foil. If it’s on lead it won’t wash off in the rain – it’s used to being outside!
I tried the stove polish on copper foil and YUK – just FYI
Oophs, just got to your question asking if it was okay for foil – ‘no’ was the answer! Good idea to try it on a practise/scrap piece though, that’s what I do with everything!
Milly, what kind of wax you use? What you can suggest?
Thanks!
Mother’s Wax is good Olena.
Can you explain the differences in using the black grafite polish vs. black patina? Thank you! J
Black graphite polish is only for lead, whereas patina can be used for both foil and lead. You can use patina on lead but I find that the process favours the graphite because it’s a bit dusty and needs brushing to clear the putty and whiting off – to patina on top of the dusty lead seems strange, whereas to polish with the graphite continues with the clean up. I hope that helps.
Good question JJ, thanks.
I have made a panel which will be installed in a bathroom. How will the blacking survive in a damp steamy atmosphere? Is there any likelihood that it would run off onto the wooden frame?
If you polish within an inch it will be fine. It shouldn’t run off at all.
If it’s an internal window and there’s existing glass in the window you could leave that in and install the stained glass window on the other side of the glass. This will protect it from the steam.
I hope that helps.
I want to use black patina on my recently finished lead came project. Should I do this before or after cementing?
You need to do the patina last, after the cementing and cleaning up. Thanks for your question Loren.
Ok, I’m new. What’s cementing?
Cementing – sometimes called puttying – is the process of weatherproofing LEADED stained glass. It’s not used for the foil technique. You can read about the cementing process here.
I hope that helps.
Great that you’re asking questions Linda, best way to learn!
I do cementing , then patina… After cleaning again with window cleaner I use car wax polish and then an electric buffer…Looks great..
Thanks for your thoughts Jay, great idea about the electric buffer. Can you tell us what model you use? Sounds good to me!
hi
is there any other colour except black for polishing the lead came? im thinking about a grey tone to make the colours pop
thanks
You don’t have to blacken the leads. You can polish them up just as they are and they are grey. It is nice to do this sometimes as it does make a difference to the panel, as you say. Thanks for your question.
What would you use for the polish if you were leaving them gray
I wouldn’t use anything – just brush up to get all the whiting off, let it dry, pick it out with a wooden stick and give the stained glass panel a final brush up. Good question Judy, thanks.
Do you always have to cement a piece if it is inside only
Hi Gail, I always cement as I like the look of it and feel that it finishes it off nicely, but no, you don’t have to if it’s a small piece (say 12″ X 12″) and is hanging inside. Anything larger will need the rigidity that cementing brings.