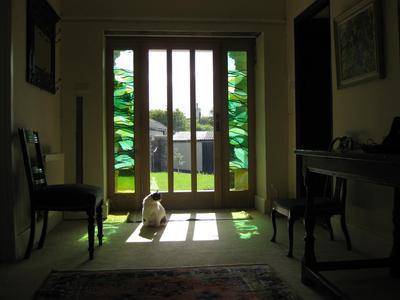
Triple-glazed glass by Milly Frances
I have an amazing piece of stained glass that I acquired from an estate sale. It’s a large piece and I would like to have it made into a front door. I have no idea who to contact or what information I need to have (other than dimensions). Will they need to double pane it? Where is the best place to start? Michelle
Milly’s reply:
Thanks for your question, sounds like you’ve got an exciting find there!
It sounds as if you’ll have to get a custom door made by a carpenter.
If you go for the triple-glazed option (see below) the depth of the sealed unit is 3/4″ or 20mm, so the carpenter will have to make sure the frame is deep enough to accommodate this.
You don’t specify the size of the panel, but as it’s for a door, it will most certainly have to have some support to prevent damage. There are two options.
One: Get it triple-glazed. This is the safest but most expensive option. It means getting a glazier to make a sealed unit, with the stained glass sitting inside the unit. They’re held in by spacers.
These units are made from tempered or toughened glass, and are therefore able to withstand the banging and swinging of the door.
My window shown in the picture above is triple-glazed, although it’s not a door, it would work equally well as one.
Two: Reinforce the panel with steel bars. This is what Victorians used for their very large panels, so it’s a recognised (if somewhat ancient!) solution.
You’ll need a wooden door, custom made to size. You need to add support about every 18 inches or 45cm.
A carpenter will be able to fit it (as per instructions below), but you might have to get a stained glass maker to solder the copper ties on (see below) if you’re not a maker yourself.
Buy a length of rebar – you can get it from stained glass suppliers (or any cylindrical metal rod will do, about 5mm diameter). Then choose a place in your panel where the bar’s going to go, and solder copper wire ties along the lead, 2.5 to 3″ apart.
Cut the rebar a bit longer (about 3/4″) than you need. Place the window in the frame and measure where the rebar will go. Put the window aside.
Drill holes into the frame, one side deeper than the other. Putty window in.
Place rebar in place, putting one end into the deeper hole first. Then tie on with copper wire ties, twisting them with pliers and making sure they are flush with the bar/lead and therefore not visible.
So it’s not as easy as you think… but I hope you persevere, as there’s nothing nicer than a colourful window welcoming you home every night and greeting you each morning!
Good luck. Come back and post the result on the site when it’s done!

