Simple Instructions For Making Leaded Stained Glass
This is where making leaded stained glass really gets exciting! Once you have cut all your glass pieces out, the next step is to join them together using stained glass lead came. The lead comes in 6′ lengths or on a spool. It can either be flat or rounded and comes in different widths, the most common being from 5/64″ to 1/2″ wide.
Some lead is hard and some is softer and more pliable. It might be worth checking before you buy as the hard lead is tricky to cut and shape for beginners.
Leading up is one of the trickiest things to learn, so take your time and be patient. It’s more than worth it! Leading up is the point in the stained glass making process where you start to see your panel beginning to take shape and looking like a real stained glass window.
If you’re new to using lead came as a technique I would highly recommend you give it a try. It will add a great deal to your skill set and give you the best of both stained glass worlds – foil and lead.
If you don’t have a local class my Leaded Stained Glass Artistry course has taught many people – even those who have never used lead before – how to make a stained glass panel using lead came. The course is self-paced and online so you can learn this lovely technique even if you are unable to get to a class. You can find out more about it here Leaded Stained Glass Artistry.
What You Need
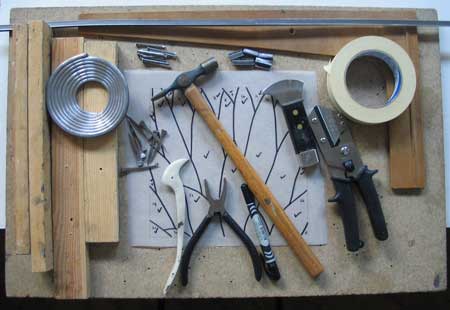
- Stained Glass Lead Came (*paid link)
- Cut Glass Pieces
- Horseshoe Nails (*paid link)
- Lead Knife or Lead Nippers(*paid link)
- Lead Stretcher and regular Pliers (*paid link)
- A piece of chipboard roughly 3″ (75mm) bigger than your panel all round
- 4 straight wooden batons
- Your Pattern, masking tape, fid, hammer, set square and regular nails.
Making Leaded Stained Glass Panels
1. How To Stretch And Open Up The Lead Came
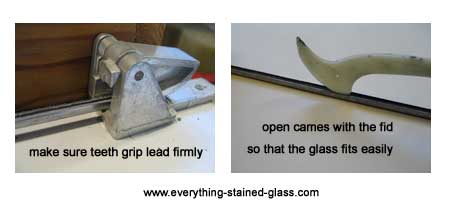
When you first get your lead came it is floppy and bends all over the place. To make it stronger and easier to use it has to be stretched, unless you purchase pre-stretched lead available in north America.
How do you stretch lead came?
- Place the end of the lead into the jaws of the stretcher and hold the other end with the pliers.
- Make sure you’re standing with one leg behind the other and pull the came with little sharp tugs until you can’t feel any more ‘give’.
- Carefully place the lead came on a table. Using the fat end of the fid, run it inside both channels of the lead. This opens it up so that you can fit the putty in easily later.
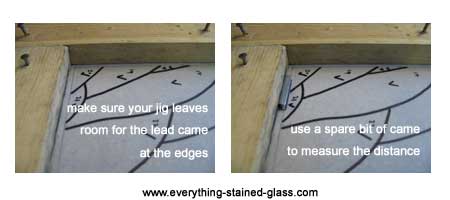
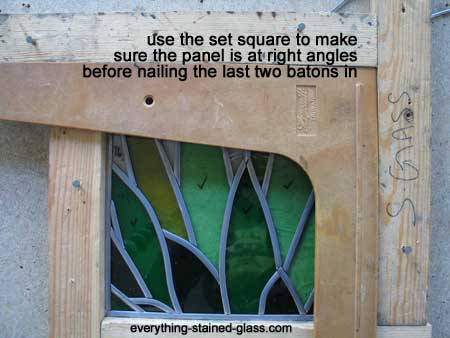
2. Preparing The Leading Up Board
- Tape your pattern flat onto a piece of board, leaving about 3″ around each edge.
- Before you make your jig with the first 2 wooden batons, make sure you leave room for the outside leaf of the lead came (see photo below). Your glass will not fit the pattern if you don’t do this.
- Use the set square to make sure the wood is at right angles.
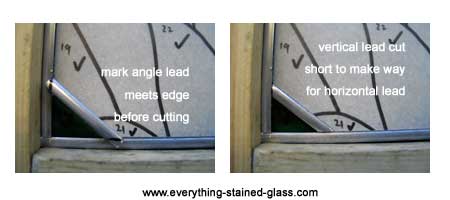
3. Cutting The Border Lead
When making leaded stained glass, the first pieces of stained glass lead came to cut are the edge vertical and horizontal ones.
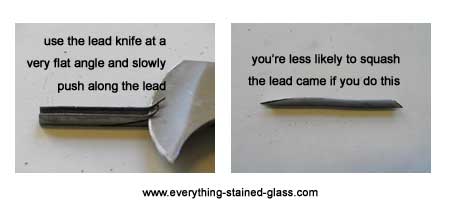
- Mark the angle you want to cut across the top of the lead with the lead knife or a pen.
- Then push the lead knife gently and vertically through the top flange, rocking it from side to side to make sure you don’t squash the lead. If you are using lead nippers, simply line them up with your mark and cut through the came.
- Use a scrap of your border came to work out what length to cut these leads.
- Once you’ve got the outside leads in you can put your first piece of glass in.

4. Leading Up The Panel
The internal leads used for leaded panels are most commonly 3/16″ (5mm) or 1/4″ (6mm). Any wider and they start to look too dominant and hide the glass. You can use different widths in the same piece to make part of it stand out if you like.
- Stretch and open the channels of the internal leads as before.
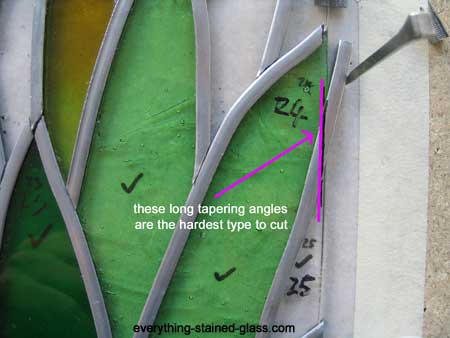
- Work out and mark the angle at which one lead meets the other before cutting.
- Cut the leads a little shorter than the glass, to make room for the flange it’s butting up against. You can use a scrap piece of came as a gauge to help determine how short it has to be.
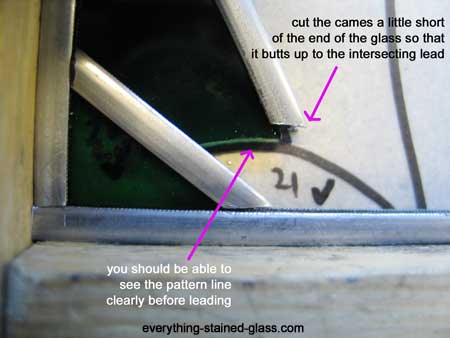
- Some angles are more difficult than others. Long, thin ones are the most tricky, as it’s easy to squash them.
5. Holding It All In Place
As you start fitting more and more pieces, you’ll find that making leaded stained glass requires at least 4 hands! The pieces want to keep popping out all over the place.
- Use horseshoe nails banged into little pieces of scrap lead to keep everything firmly in place.
- Build up the glass pieces diagonally from the left hand corner of your board if you’re right-handed.
- You can run the lead along more than one piece of glass to reduce the amount of lead shaping needed but be aware that leads that go from one side to another create a natural fold point. Avoid this by cutting the lead and intersecting with a perpendicular lead. This makes for a stronger panel.
6. Making Sure The Panel Is The Right Size
- Keep checking that you’re sticking to your pattern.
- Don’t panic if your panel is getting bigger, this often happens. Be prepared to dismantle your leaded panel to check where things aren’t fitting. It’s easy to re-assemble once the leads are cut and shaped.
- Be aware that more often than not it is the lead came that’s too long and needs cutting to make the pieces fit, rather than the glass that’s too big so double check that constantly. If the glass was cut accurately and fitted before you started leading up, it shouldn’t need too much grinding.
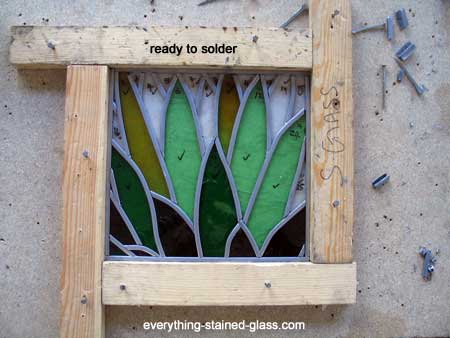
7. Cutting The Final Leads
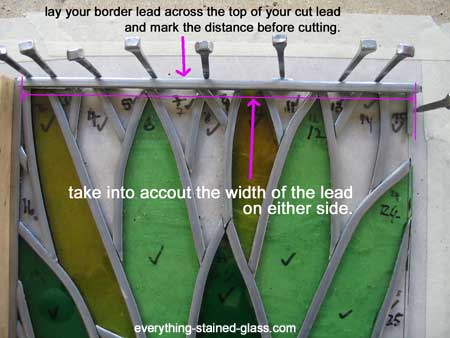
- Carefully rest the came along the edge of your panel to see what length you need.
- Measure, mark and cut the vertical lead, making sure you leave room for the horizontal one.
- Repeat for the horizontal lead.
- Now nail in the two remaining batons, checking they are at right anges and that the panel is the correct size.
Helpful Resources
Here’s a useful short video showing how to cut lead came with three different tools; a knife, nippers and angle cutter.
Video showing how to cut lead with three different cutting tools
Can you tell me where I can purchase the angle lead nippers? Amazon does not know when or if they will be available.
Does this link work: https://amzn.to/2WvxE3I or this one if you’re in the UK: https://amzn.to/2z1m7lm (paid links) Lots of products have suffered supply problems due to covid so I can’t help with the timings or availability, sorry.
Can the glass be different thicknesses I am useing agate slices and cut them in all different thicknesses thanks
Yes, as long as it’s not so thick that it doesn’t fit into the lead channel Jason.
At the beginning of the article you mentioned some lead is softer and more pliable than others. I bought some H lead from a stained glass supplier for a project and I can’t cut through it. My knife is new, too. How can I find the softer lead you refer to?
Good question Donna, Cascade Metals sell the different hardnesses of lead came. Hope that helps.
hi milli,
i’m making a small oval frame for an old concert ticket. i’m using hobby came with thin picture frame. i’m wondering what the best way to secure the oval while trying to solder the one seam. i’m using a right angle jig and tucking the left side into it and using scrap came to use next to the frame as i use the horseshoe nails to secure it so it doesn’t ruin the frame.
1- is that always necessary? will the nails always scuff up and dent the came?
2- anything else i can do to make a better fit? i find that as i’m soldering the frame it gets untucked from the nails and loosens.
please help! 🙂
You’re right to use a snippet of the lead in between the horseshoe nail and the frame lead to protect it. You can buy stop blocks like these from Amazon here. Either way, you do need to protect the frame lead, yes.
You’re doing the right thing; just make sure the nails are secure and tight next to the piece and they shouldn’t move.
Hi Milly,
I’m cooped up at home due to Coronavirus and decided to try out a stained glass project that I’ve always wanted to do. I’m looking at lead came and was wondering if there are different types of lead came in terms of alloys added to make it stronger? I’m not talking about zinc channel for borders or other reinforcements, I want the traditional 1/4” round H lead came and will use a border of zinc. My pattern is going to be very geometric (frank Lloyd Wright style) so the straighter the better for my lead. I have local supplier that makes their own lead in Massachusetts. They say they use pure lead with added tin and other additives. I’m concerned that it might not be as strong as lead made by manufacturers like Cascade.
thanks for keeping up this site and your help!
Mike.
As long as this lead stretches out straight it should be fine but I can’t comment specifically as I haven’t seen it. Some lead came comes pre-stretched and is less pliable as a result but you can stretch it yourself.
This page has a section on stretching lead came:
https://everythingstainedglass.com/stained-glass-lead
I hope that helps.
I’m still confused on which types of came to use. I understand hobby came can be added to the exterior pieces of small sun-catchers to add strength and durability; I’ve done them works great combined with copper foil on internal pieces. But why don’t they make a hobby came in H, flat and round, to match up to the 5/64″ hobby U came? And then, If I use 1/8″ U on exterior pieces, why can’t I find 1/8″ H to match? What am I missing?
Leaded panels traditionally use a special putty under the H came to strengthen and weatherproof the panel. Hobby Came – the name gives it away – is very narrow and is for small sun catchers to finish the edges off nicely. 1/8″ H came would be too narrow for the glass to fit in under the flanges of the came and not wide enough for the special putty.
I hope that explains the different uses for Hobby and regular lead came.
If you’re interested in learning how to make leaded panels for windows, I have an online course here that will show you how.
My question is about lead came, that has not been stored in any container. I have had came stored in my garage ( in Florida heat) for over 15 years. I am now planning a project, which requires came. Should I throw away the old came? I am thinking it may not “take” the solder, or the flux, due to exposure to dust and humidity over the years. What do you think?
Don’t throw it away Karen. Try resurrecting it with a wire brush, just around the joint areas. Make sure you get back to the silver, then flux and solder as normal. Test each length first though before using in a panel, to check it will take solder. You don’t want to lead up your stained glass window and then find out it’s beyond rescuing. Yikes! Good luck.
I have been asked to make a panel that is 2 x 3 ft in size. It is going to be fitted as an internal window as a light source through a dividing wall. Do I need to strengthen the panel with something or will the leading hold it firmly enough do you think? I’ve never made one that big before and I don’t want it to flex too much as I transport it.
Yes, a stained glass window this size will need reinforcing Emily. The strengthening lines should be factored in right at the beginning at the design stage. Reinforcing has to go from edge to edge to be effective. If you have 12mm quarter rounds holding the panel in this can help with making the panel secure on the perimeter.
You can use ReStrip, lead with a steel core for straighter lines or Strongline. I hope that helps.
Hi Milly,
What a pleasure reading your mail that is loaded with such valuable information. What ever you have said , i tried and it works, I must master cutting profiles freehand. (pressure pressure). Cutting straight lines I am happy with. Thanks for your valuable information, looking forward to your next mail.
REGARDS,
WILLEM
That’s nice Willem, thanks for taking the time to comment. I’m always happy to hear that my teaching is helping people improve their stained glass making.
After the piece is done and putty do you wax the whole piece?
I don’t wax stained glass lead, no. I polish it with stove polish. You can see the Cement and Polishing steps here.
Thanks for your question and good luck!
It’s difficult to find well-informed people on this subject, but
you seem like you comprehend what you’re talking about!
Thanks
Thanks Kaylene, that’s a nice comment to read. I have a lot of experience with making leaded stained glass; the fact that I’m able to share it in a way that people understand is a bonus for me 🙂
Thank you so much all the tips you have given me. I have learned a lot from soldering to cutting the glass and foiling. I look forward to your next tip you send my way. Thank you again
Aw, that’s such a nice comment to leave, thanks Elizabeth, thanks 🙂